Conditional GANs (cGANs) are a type of neural network that generates specific outputs by combining random noise with additional input, like labels or descriptions. Unlike standard GANs, which produce random results, cGANs give you control over the output. Here’s how they work:
- Generator: Creates fake data that aligns with the given condition (e.g., generating an image of a "7" when asked).
- Discriminator: Evaluates if the generated data is real or fake and if it matches the condition.
- Conditioning Inputs: Provide extra information (e.g., labels or text) to guide the generation process.
This method has practical uses across fields like healthcare, urban planning, and image synthesis, enabling precise and targeted content creation. While cGANs require labeled data and are more complex than standard GANs, they excel in tasks where accuracy and control are essential.
Conditional GAN: Controlling your Generation
sbb-itb-a759a2a
Core Components of Conditional GANs
Conditional GANs (cGANs) are built on a system of three key components that work together to generate targeted outputs. Each plays a unique role, making it possible for machines to create specific, high-quality results on demand.
The Generator
The generator is responsible for creating synthetic data that looks real while adhering to a given condition. As Coursera Staff explains:
The generator's job is to create a fake output that is so convincing that the discriminator cannot tell fake from real.
To achieve this, the generator takes two inputs: a random noise vector and a conditioning input, such as a class label. For example, categorical labels like "0" for Rock, "1" for Paper, and "2" for Scissors are converted into dense vectors using an Embedding layer. These vectors are reshaped and combined with the noise vector through a Concatenate layer, effectively adding the condition as another channel.
The combined data is then processed through Transposed Convolutions or upsampling blocks, which scale it up to the desired dimensions, such as a 28×28 pixel image. Aditya Sharma highlights this process by stating, "The Generator is parameterized to learn and produce realistic samples for each label in the training dataset".
However, the generator doesn't work alone. It relies on the discriminator to validate both the realism and the accuracy of its outputs.
The Discriminator
The discriminator evaluates the generator's outputs using a two-step process. Unlike traditional GANs, which only assess whether an image is real or fake, the cGAN discriminator also checks if the image matches the specified condition.
This process uses conditional probability, D(x|y), where "y" represents the class label. The discriminator combines the generated image with the conditional metadata into a joint representation. For instance, a 3-channel RGB image might be paired with a reshaped label embedding to create a 4-channel input.
The discriminator is designed to reject mismatched pairs. An example of this can be seen in a July 2021 project that used 2,892 CGI images from the Rock Paper Scissors dataset. In this case, the discriminator rejected real images of "Rock" incorrectly labeled as "Paper", forcing the generator to produce outputs that matched the given label. This strict evaluation ensures that the generator cannot bypass the conditions by simply producing realistic but unrelated images.
Conditioning Inputs
Conditioning inputs provide the additional information needed to guide both the generator and the discriminator. These inputs could be anything from class labels and text descriptions to other images, serving as the foundation for targeted generation.
By incorporating these inputs, the system models conditional probabilities, P(x|y), where "y" is the provided condition. For instance, in a January 2024 implementation using the MNIST dataset of 70,000 handwritten digits, researchers supplied the generator with a 100-dimension noise vector combined with a one-hot encoded label (0-9). This allowed the system to generate specific digits, like a "5" or an "8", with impressive accuracy.
Using conditioning inputs not only improves the precision of the generated outputs but also speeds up the training process. By focusing on specific patterns for each class, the network learns faster compared to attempting to understand the entire data distribution all at once.
Step-by-Step Guide to Using Conditional GANs
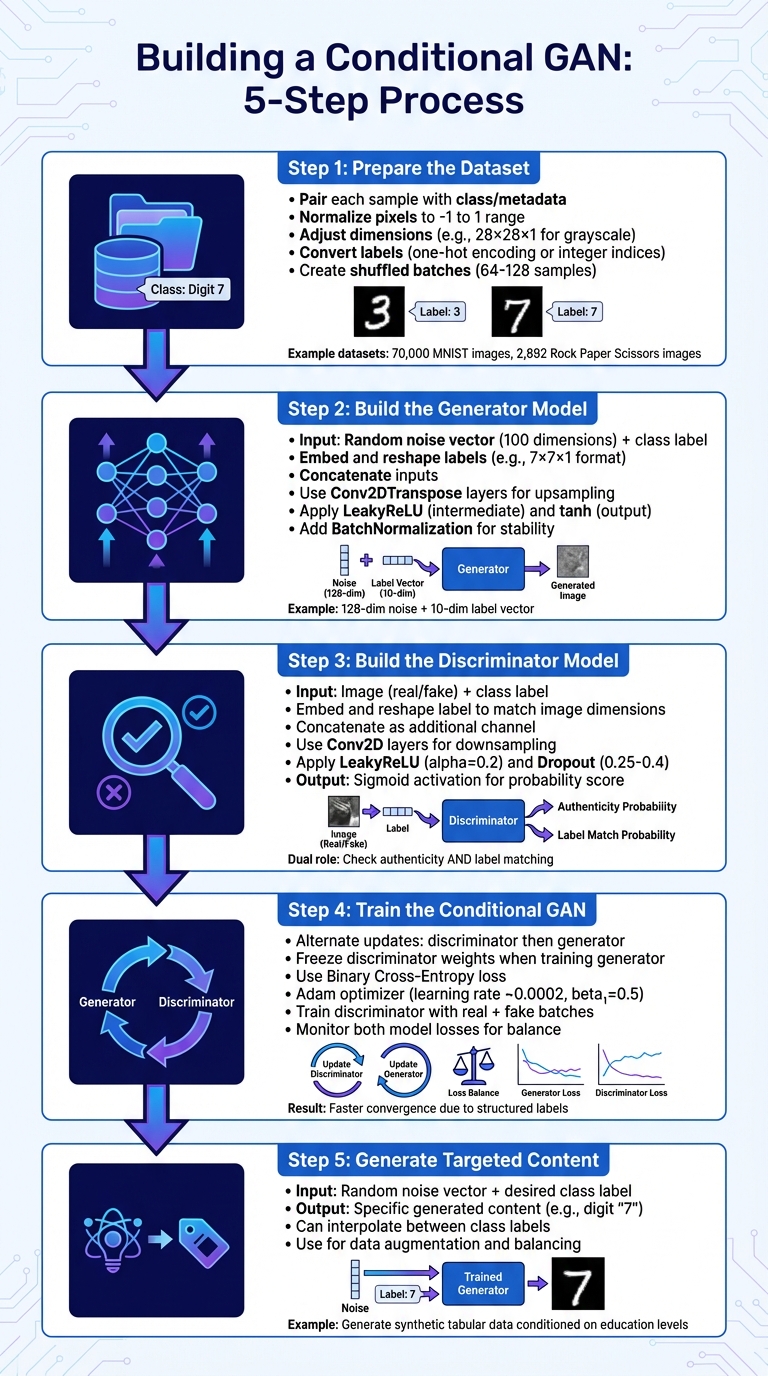
5-Step Process for Building and Training Conditional GANs
Creating a Conditional GAN (cGAN) from scratch is a detailed process that turns labeled data into a system capable of producing specific outputs on demand. Below is a simplified breakdown of the five key steps involved in building and deploying a cGAN.
Step 1: Prepare the Dataset
The success of a cGAN begins with a well-prepared dataset. Unlike standard GANs, cGANs need each data sample to be paired with its corresponding class or metadata. For example, you could use datasets like the 70,000 28×28 MNIST images or 2,892 RGB Rock Paper Scissors images.
Here’s what to do:
- Normalize pixel values to range from -1 to 1, aligning with the tanh activation function typically used in the generator's output.
- Adjust image dimensions to include a channel dimension (e.g., 28×28×1 for grayscale or 128×128×3 for RGB).
- Convert labels into a format that works with your model, such as one-hot encoding or integer indices for an Embedding layer.
- Divide the data into shuffled batches (commonly 64 or 128 samples) to preserve the strict pairing of images and labels.
Step 2: Build the Generator Model
The generator takes two inputs: a random noise vector (usually 100 dimensions) and a conditional input representing the class label. After embedding and reshaping the labels to align with the noise vector (e.g., into a 7×7×1 format), the inputs are concatenated. This combined input flows through Conv2DTranspose layers to upsample the data to the target image size (e.g., 28×28 pixels).
For example, in previous implementations, a latent dimension of 128 was used alongside 10 classes. The generator combined a 128-dimensional noise vector with a 10-dimensional label vector, while the discriminator processed a 28×28×1 image concatenated with a 28×28×10 label map.
Key tips:
- Use LeakyReLU for intermediate layers and tanh for the final output layer.
- Apply BatchNormalization after upsampling layers to stabilize the training process.
As Pere Martra, Co-founder and Advisor at Towards AI, highlights:
Using a LeakyReLU activation instead of ReLU is one of the GAN Hacks recommendations.
Step 3: Build the Discriminator Model
The discriminator evaluates both the authenticity of an image and whether it matches the provided label. It takes two inputs: an image (real or fake) and its associated class label. The label is embedded and reshaped to match the spatial dimensions of the image (e.g., 28×28×1) before being concatenated as an additional channel. This multi-channel input is processed through Conv2D layers to downsample the data.
Aditya Sharma, author at LearnOpenCV, explains the discriminator’s dual role:
The Discriminator learns to not just recognize real data from fake, but also zeroes onto matching pairs. A pair is matching when the image has a correct label assigned to it.
Additional pointers:
- Use LeakyReLU with an alpha of 0.2 for hidden layers.
- Add Dropout (typically between 0.25 and 0.4) to reduce overfitting.
- The final Dense layer with sigmoid activation outputs a probability score indicating whether the image-label pair is real or fake.
Step 4: Train the Conditional GAN
Training a cGAN involves alternately updating the discriminator and the generator. While updating the generator, freeze the discriminator’s weights so that only the generator’s parameters are adjusted. Train the discriminator separately with two batches: one containing real images and their labels, and another containing fake images and their labels.
Here’s what to keep in mind:
- Use Binary Cross-Entropy as the loss function for both models.
- The Adam optimizer (learning rate ~0.0002, beta₁ = 0.5) works well for maintaining training stability.
- Incorporating class labels helps the model converge faster by imposing more structure compared to unconditional GANs.
- Monitor the losses of both models to ensure balanced training.
Step 5: Generate Targeted Content
Once training is complete, generating specific content is easy. Feed the generator a random noise vector along with a desired class label, and it will produce the corresponding output. For instance, providing a noise vector with the label “7” will generate an image of that class.
A practical example comes from Harish Siva Subramanian, who, in January 2025, used a cGAN to generate synthetic tabular data from the Adult Income Dataset:
In his example, the model was conditioned on education levels to generate synthetic attributes (such as age and hours worked per week) for controlled data augmentation.
Additionally, a trained cGAN can interpolate between multiple class labels in the latent space. This technique is useful for tasks like image-to-image translation or balancing datasets with uneven class distributions. This step underscores the versatility of cGANs in producing content tailored to specific requirements.
Conditional GANs vs. Standard GANs
When comparing Conditional GANs (cGANs) to standard GANs, the standout difference lies in control. Standard GANs generate outputs without any specific direction, producing random samples from the training data distribution. In contrast, cGANs introduce an element of precision by incorporating auxiliary information - such as class labels or feature vectors - into the generation process. This means you can guide cGANs to create outputs tailored to specific conditions.
This added control fundamentally alters how the two networks function. In a cGAN, the generator doesn't just focus on creating realistic outputs; it must also ensure those outputs align with the provided conditions. As LearnOpenCV highlights:
The Conditional Generator now shoulders a lot more responsibility than the vanilla GAN or DCGAN.
The discriminator also takes on a dual role. It evaluates whether an output is real or fake and checks if it matches the given label, fostering a more structured and goal-oriented training process. This mechanism often leads to quicker convergence and improved training stability for cGANs.
Interestingly, despite their increased complexity, cGANs tend to converge faster than standard GANs. Data Scientist Avikumar Talaviya explains this phenomenon:
By providing additional information to the model... Convergence will be faster. Even the random distribution that the fake images follow will have some pattern.
The conditioning labels act as guideposts, simplifying the generator's task by narrowing the range of possibilities and giving it clearer objectives. However, this comes with a trade-off: cGANs require labeled data, making them either semi-supervised or supervised models. Standard GANs, on the other hand, work in a fully unsupervised manner. The need for labeled data enables cGANs to excel in applications like image-to-image translation, text-to-image synthesis using advanced AI tools for blog content creation, and generating synthetic samples for underrepresented classes in imbalanced datasets.
Comparison Table: Conditional GANs vs. Standard GANs
| Feature | Standard GAN | Conditional GAN (cGAN) |
|---|---|---|
| Controllability | Low; generates random samples | High; produces label-specific outputs |
| Generator Input | Random noise vector (latent space) | Random noise vector + conditional label/data |
| Discriminator Input | Image only (real or fake) | Image + conditional label/data |
| Training Stability | Often unstable; prone to mode collapse | More stable due to guided learning |
| Learning Type | Unsupervised | Supervised or Semi-supervised |
| Convergence Speed | Can be slow | Generally faster with guided conditioning |
| Use Cases | General data augmentation, random face generation | Image-to-image translation, text-to-image synthesis, targeted data generation |
Conclusion
Conditional GANs (cGANs) bring a new level of precision to content generation by allowing controlled and targeted outputs. Unlike traditional GANs, which generate random results, cGANs let you dictate the type of content you want by conditioning both the generator and discriminator on specific labels or auxiliary data. This approach shifts the process from being entirely unsupervised to a more guided, supervised, or semi-supervised framework, making it a powerful tool for creating focused outputs.
To achieve efficient and stable training, techniques like LeakyReLU activation and data normalization are essential. These strategies, alongside multi-input models, help ensure faster convergence and reliable results, echoing the step-by-step methods outlined earlier.
The applications of cGANs are vast, spanning industries like aerospace, medicine, urban planning, and computer vision. In computer vision, cGANs excel in tasks such as image-to-image translation, text-to-image synthesis, and even balancing datasets by generating synthetic samples for underrepresented categories.
However, cGANs come with challenges. They rely heavily on high-quality labeled data, which can be costly and time-consuming to gather. This dependency increases resource demands compared to standard GANs. Additionally, their architecture is more complex, requiring multi-path structures to integrate conditioning inputs effectively. Despite these hurdles, the ability to generate precise, tailored content makes cGANs indispensable in scenarios where accuracy is more critical than randomness.
The demand for expertise in cGANs reflects their growing importance. With data science roles projected to grow by 34% through 2034, mastering cGAN techniques positions you to thrive in industries that value precision and innovation. By applying these insights, you can harness cGANs to meet specific, targeted needs across a wide range of dynamic fields.
FAQs
What conditions can a cGAN use besides labels?
Conditional GANs (cGANs) aren't limited to just labels - they can use a variety of conditions like attributes, features, or contextual details. For instance, they can incorporate specifics such as colors, shapes, or object types. These inputs guide the generation process, allowing the outputs to align more closely with the desired traits.
How much labeled data is needed to train a cGAN effectively?
There isn't a set number of labeled data points needed to train a cGAN effectively. The amount required depends on various factors, such as the complexity of the task and how well the data represents the desired outcomes. However, in most cases, cGANs tend to deliver better results when they are trained with a larger volume of high-quality labeled data that closely matches the intended attributes or target audience.
How do I tell if my cGAN is ignoring the condition?
If you're concerned that your conditional GAN (cGAN) might be ignoring the condition, here's a straightforward way to check: compare the generated outputs to the input conditions you provided. If the results consistently fail to align with the expected attributes tied to those conditions, there's a good chance the model isn't conditioning properly.
To address this, take a closer look at your training process. Make sure the conditioning mechanism is correctly integrated into the model. Additionally, verify that the discriminator is accurately evaluating the conditioned inputs as part of its learning process. Small missteps in these areas can lead to the model overlooking the conditions entirely.