Neural Style Transfer (NST) is a technique that combines the structure of one image with the artistic style of another to create a new, stylized image. It uses pre-trained neural networks like VGG-19 to extract features from images and optimize them iteratively. This process has transformed how images are stylized, making it accessible for both personal and professional use.
Key Takeaways:
- How it works: NST identifies content and style features using a neural network and combines them into a generated image.
- Applications: Used in apps like Prisma, gaming, film, and fashion to create stylized visuals.
- Tools: TensorFlow and PyTorch are popular frameworks for implementing NST.
- Optimization: Balancing content and style weights is crucial for achieving the desired output.
- Accessibility: Platforms like Google Colab provide free GPU access to run NST efficiently.
Whether you're a beginner or an experienced developer, NST offers a way to create stylized images quickly and effectively. The article dives into the process, tools, and practical tips to get started.
Neural Style Transfer : From Theory to Pytorch Implementation

sbb-itb-a759a2a
Core Components of Neural Style Transfer
How Neural Style Transfer Works: 3-Step Process from Content to Stylized Image
Content Image, Style Image, and Generated Image
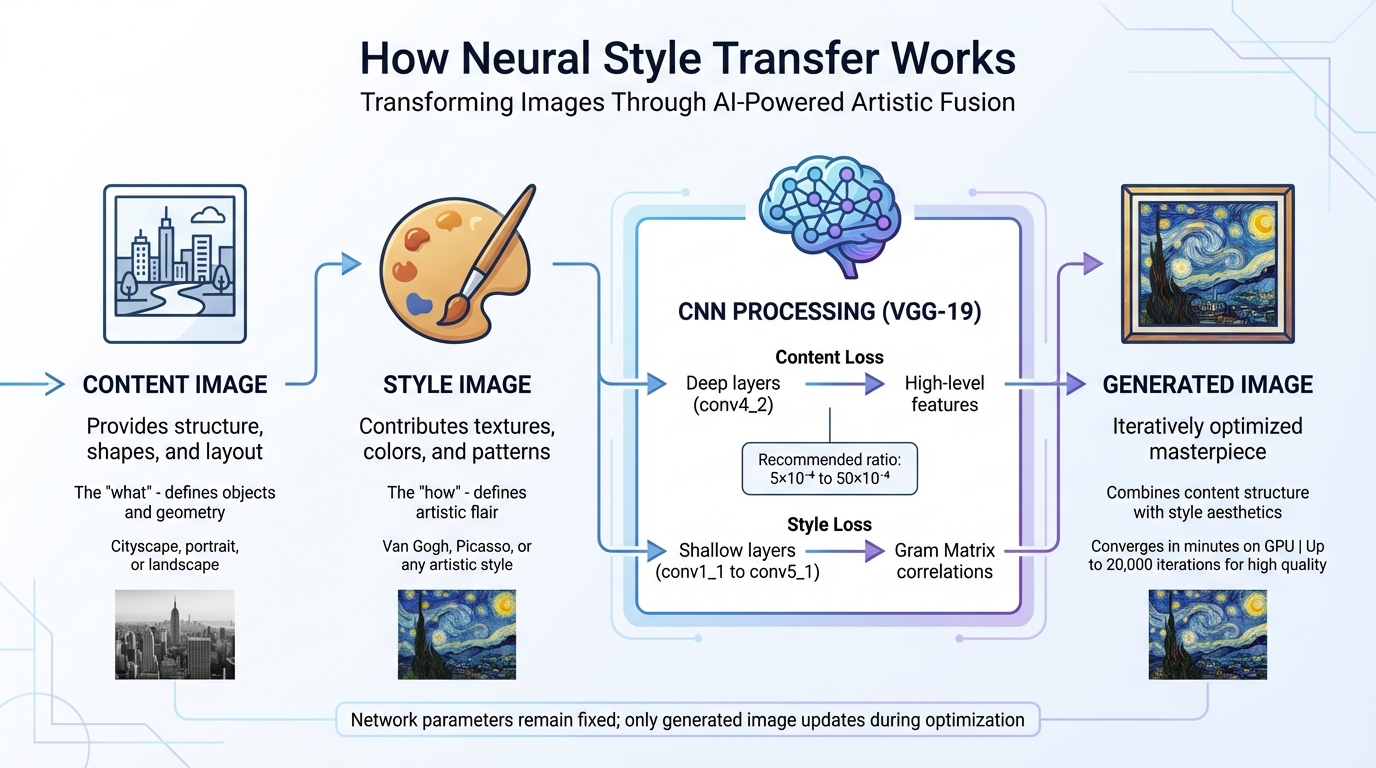
Neural Style Transfer (NST) revolves around three key images: the content image, style image, and generated image. Each plays a distinct role in creating the final piece of art.
The content image serves as the backbone, providing the structure, shapes, and layout. Think of it as the blueprint - whether it's a cityscape, portrait, or landscape, this image defines the "what" of the artwork.
In contrast, the style image brings the artistic flair. It contributes textures, colors, and patterns, shaping the "how" of the artwork. As Baeldung on Computer Science puts it: "The content of an image consists of the objects, the shapes, and the overall structure and geometry... the style of an image has to do with the textures, the colors, and the patterns".
Finally, the generated image is the evolving masterpiece. This image undergoes iterative optimization, starting as either random noise or a copy of the content image to speed up the process. While the generated image gets updated during iterations, the neural network's parameters remain fixed.
These three images are processed through a fixed Convolutional Neural Network (CNN), setting the stage for the fusion of content and style.
How Neural Networks Work in NST
Now that the roles of the images are clear, let's dive into how CNNs make the magic happen. Pre-trained CNNs, like VGG-19, are often used in NST as feature extractors. These networks capture image features at various depths, with different layers specializing in different aspects. Deeper layers (e.g., conv4_2) identify high-level features like structure and objects, while shallower layers (e.g., conv1_1 to conv5_1) focus on style details at varying scales.
Style isn't just raw pixel data. Instead, it’s represented using a mathematical tool called the Gram Matrix, which captures correlations between features. This approach discards spatial information but retains texture relationships. As Thushan Ganegedara from Towards Data Science explains: "The Gram matrix essentially captures feature correlations".
The NST process involves optimizing two loss functions to merge the content and style into a single image. Content Loss measures the difference in high-level features between the content and generated images using mean squared error. Style Loss, on the other hand, compares the Gram matrices of the style and generated images. The balance between these losses is crucial, with a recommended ratio ranging from 5×10⁻⁴ to 50×10⁻⁴. Adjusting this ratio allows you to emphasize either the style or the content, depending on your artistic goals.
On modern GPUs, NST optimization can converge in just a few minutes. However, achieving intricate, high-quality results might require up to 20,000 iterations, depending on the level of detail you're aiming for.
How to Implement Neural Style Transfer
Using TensorFlow for Neural Style Transfer
TensorFlow provides two user-friendly options to get started with Neural Style Transfer (NST): using a pre-trained model from TensorFlow Hub or creating a custom implementation with VGG19. Both approaches rely on extracting feature maps from intermediate layers of a convolutional neural network.
The TensorFlow Hub method is the easiest way to dive in. You'll need Python 3, TensorFlow v2.x, and libraries like NumPy and Matplotlib for handling and visualizing images. With pre-trained models, most of the complex work is already done, so you can focus on choosing your content and style images.
For a more hands-on approach, custom implementations with VGG19 let you work directly with three images: the content image (defining the structure), the style image (your artistic inspiration), and the generated image (which evolves during optimization). VGG19, pre-trained on over a million ImageNet images, serves as the feature extractor in this setup.
If you don’t have access to a local GPU, platforms like Google Colab provide free GPU access, which can significantly speed up processing. On a GPU, tasks that might take minutes on a CPU can be completed in milliseconds. If GPU access isn’t an option, resizing your images to smaller dimensions (e.g., 256×256 pixels) can reduce computational demand and help avoid memory issues.
Once you're comfortable with TensorFlow, you can explore PyTorch for a more flexible NST implementation.
Using PyTorch for Neural Style Transfer
PyTorch offers another option for implementing NST, emphasizing flexibility. The official PyTorch tutorial explains how NST allows you to recreate an image with a new artistic style. Like TensorFlow, PyTorch also uses VGG19 as its backbone model.
One key difference with PyTorch is the optimization approach. Instead of training model weights, you freeze the VGG19 parameters and optimize the pixel values of the generated image. To get started, you'll need PyTorch, torchvision (for accessing the VGG19 model), and Pillow for image processing. The L-BFGS optimizer is often preferred over Adam in this case, as it tends to converge more effectively when optimizing a single image.
Before processing, make sure your content and style images are resized to the same dimensions (e.g., 512×512 pixels). Normalize them using VGG19’s standard mean ([0.485, 0.456, 0.406]) and standard deviation ([0.229, 0.224, 0.225]). If you have a GPU, use torch.cuda.is_available() to detect and leverage it for better performance. Keep in mind that a minimum of 8 GB RAM is recommended to handle the memory-intensive calculations.
When setting up your optimization, start with an alpha/beta ratio (content weight vs. style weight) of 1/1000 as a baseline. Adjusting the style weight will emphasize artistic patterns, while increasing content weight preserves more of the original image's structure. During optimization, ensure that image values are clamped between 0 and 1 to produce valid outputs.
Applications and Benefits of Neural Style Transfer
Creating AI-Enhanced Content
Neural Style Transfer (NST) is transforming how visual content is created and customized across industries. Social media managers, for instance, use it to establish a cohesive aesthetic that aligns with their brand's identity [24, 25]. Marketers can take existing product photos and give them a fresh twist - imagine a "neon punk" design applied to smartphone images - grabbing attention without the need for constant professional photoshoots.
E-commerce businesses are also tapping into NST's potential by reimagining a single product photo in various artistic styles. Whether it's minimalist line art or bold pop art, these transformations showcase versatility while cutting photography costs by up to 60%. Designers use NST to create bespoke textures and backgrounds, such as turning simple wood grain or paper images into striking website backdrops.
"At its core, AI image style transfer is a creative partnership between human intention and machine perception." – AI Photo Generator
For professional workflows, NST's batch processing capabilities are a game-changer. Teams can apply a consistent style to hundreds of images - like an entire product catalog - in significantly less time than manual editing. To avoid copyright issues in commercial projects, consider using public domain artworks, such as those by Van Gogh, Rembrandt, or Da Vinci [24, 25]. Starting with a "Style Strength" of 50–60% is often recommended to maintain the original image's recognizable features while still achieving the desired artistic effect.
Beyond its practical uses, NST also invites creators to explore new artistic possibilities.
Experimenting with Different Artistic Styles
While NST enhances commercial content, it also serves as a tool for creative experimentation. What might take an artist hours to achieve can now be done in minutes [24, 26]. By separating the "artistic DNA" (style) from the "blueprint" (content), NST allows you to transform everyday photos into comic book illustrations, impressionist paintings, or any visual narrative you can imagine [4, 24].
Popular trends include anime and manga-inspired designs, neon and cyberpunk aesthetics for tech branding, and retro vibes from the 80s, 90s, and Y2K eras that bring storytelling to life. Watercolor and impressionist styles are particularly suited for wedding photography or romantic branding projects.
For advanced users, masking tools offer precision by enabling selective style application. For example, you could turn a person into a marble statue while keeping the cityscape behind them photorealistic, or apply a bold style to a product's background while keeping the item untouched [24, 25]. Blending multiple styles is another exciting option - imagine combining 60% Renaissance with 40% Cyberpunk to create a "Sci-Fi Renaissance" aesthetic.
To ensure high-quality results, work with high-resolution images (1920×1080 or 4K) to retain detail during transformation. Pre-processing your content by boosting contrast (20–30%) and sharpness (10–15%) can help the AI better identify structures and edges, enhancing the final output. These preparation steps align with earlier advice for achieving optimal NST results.
Common Challenges and How to Solve Them
Balancing Style and Content
Finding the right balance between artistic style and content in Neural Style Transfer (NST) involves fine-tuning two key parameters: alpha (α) for content and beta (β) for style. If the content weight is too high, the style may barely show. On the other hand, if the style weight is excessive, the original content can become unrecognizable. A good starting point is a 1:1,000 ratio (α = 1, β = 1,000). If the subject of the image becomes unclear, try increasing the content weight or reducing the style weight. However, be cautious - extreme ratios like 1:100,000 can make the original image almost impossible to identify.
The choice of layers is equally critical. To preserve content, use deeper layers, such as conv4_2 in VGG19, as they capture high-level structures without locking in pixel-level details. For style extraction, focus on multiple early-to-mid layers to capture a variety of textures and patterns.
If the output looks grainy or pixelated, Total Variation Loss can help smooth out the noise by encouraging spatial consistency. Switching from max pooling to average pooling can also improve gradient smoothness and produce cleaner results. Adjusting the learning rate is another effective approach - try increasing it from the default 0.001 to a range between 0.1 and 1.0, while applying a decay rate of 0.96 every 100 steps. These techniques enhance the refinement process and tie back to earlier discussions about optimizing loss functions in NST.
Managing Computational Requirements
NST can be resource-intensive, but there are ways to make it more accessible. Platforms like Google Colab, SageMaker Studio Lab, and Paperspace Gradient offer free or cost-effective GPU resources, making experimentation more affordable. Additionally, fast style transfer models can generate stylized images up to 1,000 times faster than traditional optimization-based methods.
To reduce computational demands, keep input dimensions to a maximum of 512 pixels. Load only the essential convolutional layers, such as the first 7 layers of VGG16, and exclude dense classification layers to save memory. Leveraging TensorFlow's tf.function decorator to compile loss and gradient calculations can also significantly speed up processing. These memory-saving techniques make it possible to experiment with NST on less powerful hardware while still producing impressive results.
Conclusion
Neural Style Transfer (NST) has made artistic creation more accessible, enabling anyone to turn ordinary photos into works of art inspired by legends like Van Gogh or Picasso. Pragati Baheti, a software developer, highlights its versatility:
"Neural style transfer opens up endless possibilities in design, content generation, and the development of creative tools".
For beginners, pre-trained networks like VGG‑19 simplify the process by handling feature extraction, allowing experimentation with various styles without the need to build models from scratch. Whether you're working with TensorFlow, PyTorch, or user-friendly APIs, getting started with NST has become easier than ever.
Beyond its simplicity, NST has found its way into industries like gaming, film, fashion, and design, where it accelerates the creation of stylized visuals and environments. It’s also an excellent tool for computer science learners, offering a practical way to understand advanced concepts like loss functions and feature extraction.
With the techniques shared here, you can start small: adjust content and style weights, select high-quality reference images, and refine your work through iteration. By applying methods like layer selection and computational optimization, you can produce stunning stylized images - even with basic hardware.
FAQs
What makes an image’s “style” different from its “content” in NST?
Neural style transfer (NST) works by breaking an image into two distinct components: style and content. The style captures the visual elements that define an image's artistic feel - things like textures, patterns, brush strokes, and color palettes. Meanwhile, the content focuses on the core structure or subject of the image, such as objects, people, or landscapes.
By leveraging neural networks, NST isolates these two elements, allowing you to merge the content from one image with the style of another. The result? A completely new image that blends the structure of one with the artistic flair of the other.
How do I choose the best content and style images for cleaner results?
When choosing images for style transfer, start with a clear, high-quality content image that aligns with your subject - this could be a portrait, a landscape, or any scene you want to transform. For the style image, opt for artwork or textures that have bold and distinct features. These strong visual elements help the AI effectively interpret and apply the style.
Pairing a detailed, high-resolution content image with a visually striking style image usually leads to cleaner, more polished results.
What’s the fastest way to run NST if I don’t have a GPU?
If you want to run neural style transfer (NST) without a GPU, the quickest way is to use CPU-optimized methods. Tools like Justin Johnson’s multi-scale Torch implementation or Yash Choudhary’s PyTorch-based Very Fast Neural Style Transfer are tailored for efficient CPU use. These approaches create high-resolution images by gradually increasing the resolution and cutting down on iterations, eliminating the need for a powerful GPU.